Your first asset
Click on “New Asset” to create your entry.
On that page, you can upload your asset file (.zip), give the entry a name, rating, tags and so on. New tags are created on-the-fly. Simply enter the tag you want and it will be available to the search and all other assets, after you click on save. Inside the .zip file can be a preview file (preview.jpg / .png / .jpeg / .gif / .mp3). Also, a preview image filename can have the dimensions of one sprite like this: preview_32x32.jpg. If thats the case, the “Animated” settings are automatically set.
On the right side, you can upload a preview image or preview .mp3 file. Besides that, you can enter an URL from where the file gets downloaded. If you upload a sprite sheet and want it to show animated, click on the “Animated” checkbox and fill out the fields for speed, sprite width, and height. You’ll see a real-time preview of the animation at the top. Click save and repeat the process for every asset you have or use the Bulk Import.
Hint: Uploading a .zip file is optional. As a result, you can create entries with text only, or entries with a link only.
Bulk import
With bulk import, you can create lots of assets in a short amount of time. First of all, click “Bulk Import”, read the notice and click on the button.
On the bulk import page, you’ll see FTP connection information at the top. You’ll have to upload your asset .zip files via an FTP client and refresh the page. GameAssetManager searches automatically for a preview file (.jpg, .gif, .png or .mp3) and use it. After that, fill in the desired values into the respective fields. Click on import and all of the checked files are getting imported. Easy.
GameAssetCreator
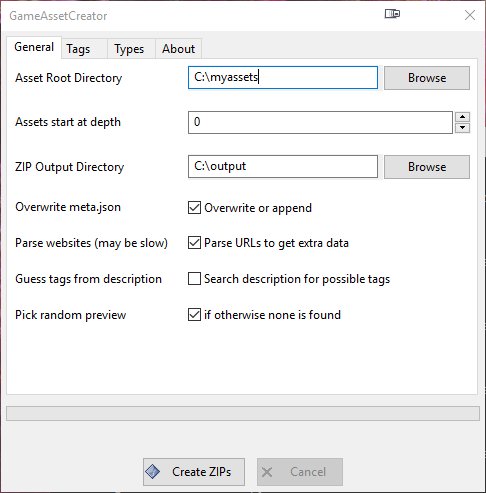
To initially prepare your assets as fast as possible, you can use our GameAssetCreator tool. It will create the needed zip files, including meta.json data, from your hard drive directories.
The meta.json file
The meta.json is a special file at the root inside the .zip file. It could look like this
{

"name": "Animal Pack Redux",

"preview": "Spritesheet/sheet1.png",

"rating": 4.5,

"tags": ["Kenney", "CC0", "Chracter"],

"url": "https://kenney.nl/assets/animal-pack-redux",

"type": "3D",

"description": "My Awesome Description"

}
- name: the name of the asset (default: .zip filename)
- preview: a relative path to the preview file inside the .zip file. (default: preview.jpg /.png / .gif / .mp3)
- rating: a number between 0 and 5, in 0.5 steps. (default: 0)
- tags: enter the tags in a comma-separated way, like in the example above. New tags are created automatically
- url: a link to the asset creator or any other link
- type: One of 2D, 3D, audio or gui (default: 2D)
- description: the description of the asset
All of the fields are optional. The meta.json file gets automatically updated every time you save your asset with the new values. Therefore if you ever have to re-import your assets, all of your edits are re-imported as well.
My Assets page
At the “My Assets” page, you can see all of your assets.
At the top are the filter options: entries per page, category filter, tag filter, and free text search.
Each row has buttons for edit, download (if the asset has a .zip file), open URL (if the asset has an URL) and delete. There’s also a checkbox on each row for bulk actions.


