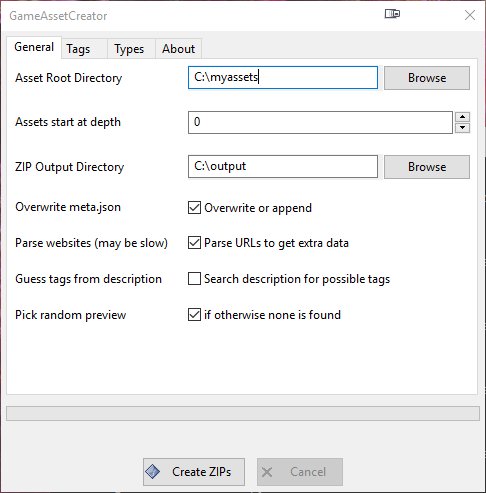
We know that the initial preparation of the assets on your hard drive can be a time-consuming task. Therefore we developed the GameAssetCreator. An open-source python tool, to prepare your assets for GameAssetManager in no time.
Installation
You need Python 3 and wxPython. The installation is rather simple:
Windows:
Download and install Python 3 from https://www.python.org/. At the installation check “Add Python 3.x to path”.
After that, open an command line with Win+R, then enter cmd.exe and hit Enter. Type in the command line:
pip install wxPython
Linux:
Install Python 3 from your distribution via the package manager (apt, yum…). For wxPython, please visit https://wxpython.org/pages/downloads/ for detailed instructions.
In summary (for Ubuntu 18.04):
pip install -U -f https://extras.wxpython.org/wxPython4/extras/linux/gtk3/ubuntu-18.04 wxPython
You can check https://extras.wxpython.org/wxPython4/extras/linux/gtk3/ for a distro that suits your needs and replace the URL.
Starting GameAssetCreator
The next step is to download GameAssetCreator from our Github page. Extract the zip file to your hard drive.
On windows, you should simply be able to double-click the gameAssetCreator.py. Otherwise, open your file explorer and navigate to the GameAssetCreator directory. Hold Shift and right click in an empty space of your file explorer. Choose “open PowerShell” or “open command prompt” from the context menu.
Alternatively, open the cmd.exe (Win+R -> cmd.exe) and cd to the directory in which GameAssetCreator is extracted.
On Linux, open a console and navigate to the GameAssetCreator directory.
Then type:
python gameAssetCreator.py
The General Tab
Right after starting the script, you should see the general settings.
Asset Root Directory and Assets start at depth
The root directory is the parent directory above your asset directories. For example, you have a directory structure like this:
- c:\
- MyAssets
- Asset 1
- Asset 2
- …
- Asset X
- MyAssets
Then “MyAssets” is your root directory. Easy.
But what if your assets are already sorted in different directories? For example:
- c:\
- MyAssets
- 2D
- Asset 1
- Asset 2
- Sounds
- Asset 3
- GUI
- …
- …
- 2D
- MyAssets
If you want all the assets in these directories prepared, then your root directory is still “MyAssets”, but you have to set “Assets start at depth” set to 1 because your assets are one directory below the root directory, and so on.
ZIP Output Directory
The directory where the generated zip files are saved
Overwrite meta.json
Defines if the meta.json, in which the data for the asset are stored, is being overridden or appended. “Overwrite” should be good in almost all cases.
Parse websites
If a valid URL is found in a text file inside the asset directory, and for that domain, a parser exists, GameAssetCreator tries to get some data from that website, like tags.
Currently, opengameart.org, gamedevmarket.net and tokegameart.net is supported.
Files in which are searched for url’s are: info|credits|readme|liesmich|license.txt|md OR any .url file.
Guess tags from description
A description is read from a text file inside the asset directory. If one is found and “Guess tags from description” is on, it searches the description for possible tags. It is default off because there can be many false positives.
Pick random preview
If no preview.png / .gif / .jpg / .jpeg / .mp3 is found anywhere inside the asset directory, the first image file found would be used as preview file.
The Tags Tab
The Tags Tab is kind of an advanced feature. Here you can define which tags you want to use and the GameAssetCreator to search for. Simple entries are single words, like “shooter” or “rpg”. If one of these words found in any filename, directory name or if “Guess tags from description” is on, description, then this tag is added to the asset. Keep in mind these are regular expressions! They can match also parts of a word, i.e. “men” would match “women”, “achievement” and so on (thats why “men” in the example above has additional regex-code, to match only the complete word “men”).
Then there are advanced entries, like “human” in the example above. Let’s say you want multiple search words assigned to one tag. Then you can define it like in the screenshot:
{

"human": ["zombie", "woman", "human", ...]

}
With that setting, zombie, woman and human would match to the “human” tag.
The Types Tab
The Types Tab is similar to the Tags Tab. The search words here are used to determine what kind of asset it is. I.e. if the word “inventory” is found in a file or directory name, then the asset is marked of type “GUI”. A main difference to the tags is, that these search words are only matched as a complete word. So, “icon” wouldn’t match “icons”.
Creating the ZIP files
If everything is set up, hit “Create ZIPs” and the GameAssetManager-ready asset zip files, including the meta.json file, are getting created. Please note: at the moment, the meta.json file is created inside the asset directories.
Now you can copy these zip files in the _import directory to bulk import them with the GameAssetManager.
Note: the GameAssetCreator may not be a tool for every situation. Also, you may want to add or remove tags, description, etc. at bulk importing stage.
We hope you find this tool useful and make your initial asset import easier.


